
- Published on, Time to read
- 🕒 9 min read
Bridging the Gap - Full Stack Development with HTMX and Spring Boot Showcase
- Authors

- Name
- Mahesh Babu
Bridging the Gap: Full Stack Development with HTMX and Spring Boot Showcase

Welcome, fellow developers, to a journey into the fascinating world of web development, where we’re about to embark on the creation of something truly engaging — our very own ASCII art generator! Picture this: taking ordinary text and transforming it into captivating visual art. Exciting, right? In this article, we’ll be diving into the collaborative magic of HTMX and Spring Boot to make this vision a reality.
HTMX is like the wizard’s wand of modern web development, known for its simplicity and user-friendly approach. It seamlessly connects the front end and back end, making it a perfect companion for crafting interactive experiences. Now, pair that with the robustness of the Spring Boot framework, and you’ve got a powerhouse combination ready to unleash creativity. To learn more about HTMX you can check out https://htmx.org/
Our main goal? To build an ASCII art generator that adds a touch of flair to plain text. Imagine typing in your favorite quote or a simple message, and watching it transform into a visually stunning piece of ASCII art. It’s not just about coding — it’s about creating an experience that brings joy and creativity to the user.
Throughout this exploration, we’ll uncover the intricacies of this dynamic collaboration. We’ll bridge the gap between the server and the browser, demonstrating how these technologies work hand in hand to create a unique and interactive web application. We will focus on making the process accessible, enjoyable, and, most importantly, user-friendly.
So, Let’s get started! Let us head over to start.spring.io and configure the project as shown below:
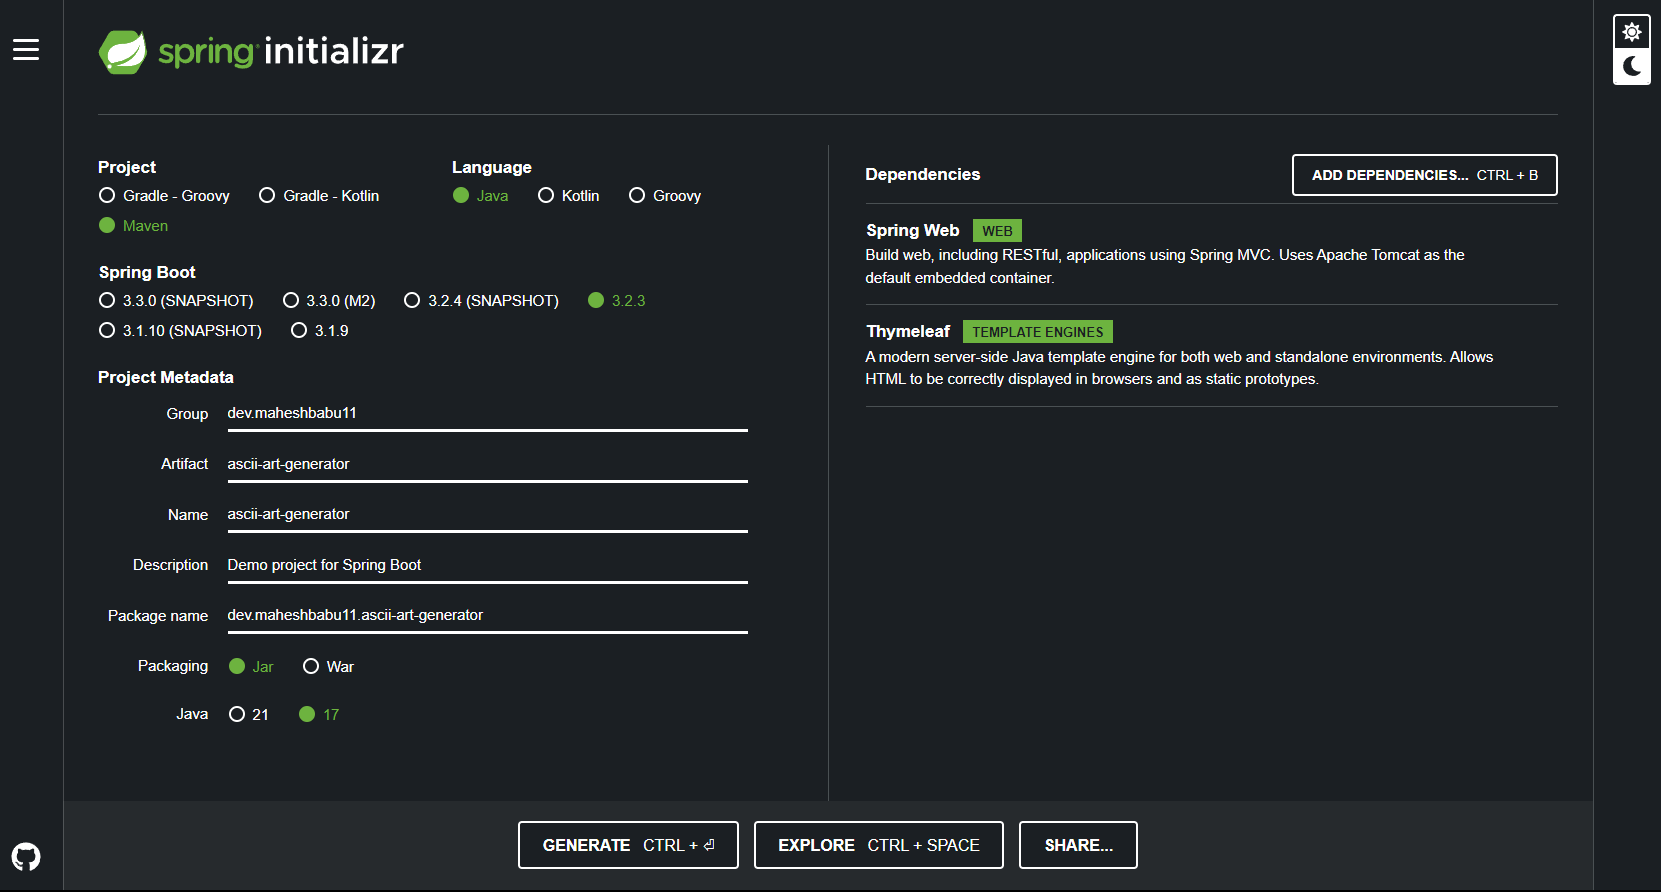
We are going to be using Java 17 for this project. The dependencies that we are using here are :
**Spring Web: **It provides essential components such as controllers, the DispatcherServlet, and View Resolver, facilitating the organization of HTTP request handling and the implementation of the model-view-controller (MVC) architecture.
Thymeleaf: Thymeleaf, a server-side Java template engine, is a key dependency often coupled with Spring Boot’s web development. Functioning as a view template engine, Thymeleaf empowers developers to create dynamic and interactive web pages by embedding expressive constructs directly within HTML templates.
We are going to be using a library called Banana which is a FIGlet utility for Java that generates text banners, in a variety of typefaces, composed of letters made up of conglomerations of smaller ASCII characters. You can check it out here: https://github.com/yihleego/banana
Now let us open the project in the IDE of your choice. I am going to be using Intellij Idea.
Add the Banana library dependency to your pom.xml as well.
Now let's get started on coding the application. Please use the below folder structure for reference
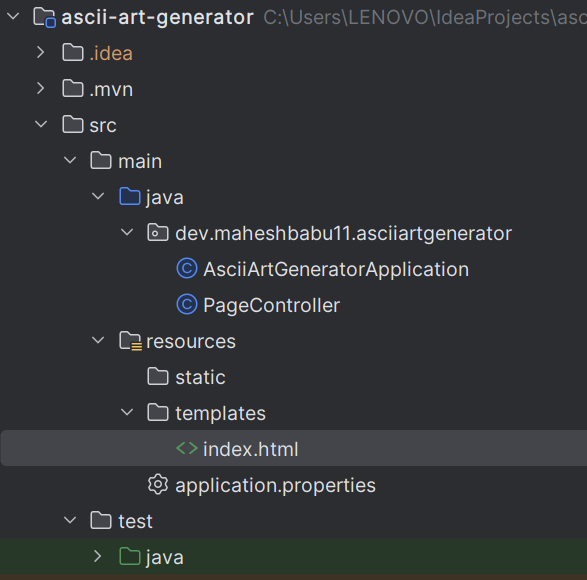
I have created the UI template in the template directory which looks something like this (index.html)
<!doctype html>
<html lang="en">
  <head>
    <title>ASCII Art Generator</title>
    <link
      href="https://cdn.jsdelivr.net/npm/[email protected]/dist/tailwind.min.css"
      rel="stylesheet"
    />
    <script
      src="https://unpkg.com/[email protected]"
      integrity="sha384-D1Kt99CQMDuVetoL1lrYwg5t+9QdHe7NLX/SoJYkXDFfX37iInKRy5xLSi8nO7UC"
      crossorigin="anonymous"
    ></script>
  </head>
  <body class="bg-gray-100">
    <div class="container mx-auto p-8">
      <h1 class="mb-8 text-center text-4xl font-bold">ASCII Art Generator</h1>
      <div class="mb-6 flex justify-center">
        <form id="input-form" class="text-center">
          <label for="input-text" class="mb-2 block">Enter Text:</label>
          <input
            type="text"
            id="input-text"
            name="input-text"
            required
            class="w-full rounded-md border px-4 py-2 focus:border-blue-500 focus:outline-none"
          />
          <br />

          <label for="font-select" class="mb-2 mt-4 block">Select Font:</label>
          <select
            id="font-select"
            name="font-select"
            class="w-full rounded-md border px-4 py-2 focus:border-blue-500 focus:outline-none"
          ></select>
          <div hx-get="/api/fonts" hx-trigger="load" hx-target="#font-select"></div>
          <br />
          <button
            class="mt-6 rounded bg-blue-500 px-4 py-2 font-bold text-white hover:bg-blue-700"
            hx-post="/api/ascii-art"
            hx-target="#ascii-art"
            hx-swap="outerHTML"
          >
            Generate ASCII Art
          </button>
        </form>
      </div>

      <div class="mt-10 flex justify-center">
        <pre id="ascii-art" class="text-center"></pre>
      </div>

      <div class="mt-8 flex justify-center space-x-4">
        <button
          class="rounded bg-blue-500 px-4 py-2 font-bold text-white hover:bg-blue-700"
          id="copyButton"
          onclick="copyToClipboard()"
          style="display: none;"
        >
          Copy
        </button>
        <button
          class="rounded bg-green-500 px-4 py-2 font-bold text-white hover:bg-green-700"
          id="downloadButton"
          onclick="downloadFile()"
          style="display: none;"
        >
          Download
        </button>
      </div>
    </div>
    <script>
      function copyToClipboard() {
        const el = document.createElement('textarea')
        el.value = document.getElementById('ascii-art').textContent
        document.body.appendChild(el)
        el.select()
        document.execCommand('copy')
        console.log('Copied to clipboard')
        document.body.removeChild(el)
      }

      function downloadFile() {
        const asciiArtContent = document.getElementById('ascii-art').textContent
        const blob = new Blob([asciiArtContent], { type: 'text/plain' })
        const downloadLink = document.createElement('a')
        downloadLink.href = window.URL.createObjectURL(blob)
        downloadLink.download = 'ascii_art.txt'
        document.body.appendChild(downloadLink)
        downloadLink.click()
        document.body.removeChild(downloadLink)
      }

      function adjustButtonVisibility() {
        const asciiArt = document.getElementById('ascii-art')
        const copyButton = document.getElementById('copyButton')
        const downloadButton = document.getElementById('downloadButton')
        copyButton.style.display = asciiArt.textContent.trim() ? 'inline-block' : 'none'
        downloadButton.style.display = asciiArt.textContent.trim() ? 'inline-block' : 'none'
      }

      document.body.addEventListener('htmx:afterSwap', adjustButtonVisibility)
    </script>
  </body>
</html>
This file represents the web page for an ASCII Art Generator, incorporating the Tailwind CSS framework for styling and the HTMX library for seamless interaction between the front end and back end. Let’s break down the key components and functionality of the code:
The Tailwind CSS stylesheet is linked from a CDN for styling purposes.
The HTMX library is linked to a CDN. HTMX is used for making dynamic requests and updating the page content without a full page reload.
We are using several HTMX tags here starting from top
hx-get: The hx-get attribute specifies a URL (/api/fonts) to make an HTTP GET request when the event specified hx-trigger occurs.
hx-trigger: This hx-trigger="load" indicates that the GET request should be triggered when the page loads.
hx-target: Thehx-target="#font-select" designates the HTML element with the ID font-select as the target for updating with the response from the GET request. In this case, it loads font options dynamically into a dropdown.
hx-post: The hx-post attribute specifies a URL (/api/ascii-art) to make an HTTP POST request when the button is clicked.
hx-swap: The hx-swap="outerHTML" indicates that the entire content of the target element should be replaced with the response from the POST request.
These are the tags we used here in addition to that we are using the below JavaScript functions to modify the page behaviour
- copyToClipboard Function:
function copyToClipboard() {
  const el = document.createElement('textarea')
  el.value = document.getElementById('ascii-art').textContent
  document.body.appendChild(el)
  el.select()
  document.execCommand('copy')
  console.log('Copied to clipboard')
  document.body.removeChild(el)
}
This function is responsible for copying the text content of the ASCII art to the clipboard.
It creates a new
textareaelement, sets its value to the text content of the#ascii-artelement, appends thetextareato the document body, selects the content, executes the ‘copy’ command, logs a message to the console, and removes thetextareafrom the document body.
- downloadFile Function:
function downloadFile() {
  const asciiArtContent = document.getElementById('ascii-art').textContent
  const blob = new Blob([asciiArtContent], { type: 'text/plain' })
  const downloadLink = document.createElement('a')
  downloadLink.href = window.URL.createObjectURL(blob)
  downloadLink.download = 'ascii_art.txt'
  document.body.appendChild(downloadLink)
  downloadLink.click()
  document.body.removeChild(downloadLink)
}
This function is responsible for generating a downloadable file containing the ASCII art.
It retrieves the text content of the
#ascii-artelement, creates aBlob(binary large object) containing the text, creates a link (<a>) with a URL pointing to the Blob, sets the download attribute to ‘ascii_art.txt’, appends the link to the document body, triggers a click on the link, and removes the link from the document body.
- adjustButtonVisibility Function:
function adjustButtonVisibility() {
  const asciiArt = document.getElementById('ascii-art')
  const copyButton = document.getElementById('copyButton')
  const downloadButton = document.getElementById('downloadButton')
  copyButton.style.display = asciiArt.textContent.trim() ? 'inline-block' : 'none'
  downloadButton.style.display = asciiArt.textContent.trim() ? 'inline-block' : 'none'
}
This function dynamically adjusts the visibility of the copy and download buttons based on the content of the ASCII art.
It checks whether the trimmed text content of the
#ascii-artelement is non-empty. If it is, the buttons are set to be displayed (’inline-block’), otherwise, they are set to be hidden (’none’).
Now we have the UI ready we need to create the APIs /api/ascii-art and /api/fonts . We will use the PageController as below for this:
package dev.maheshbabu11.asciiartgenerator;

import io.leego.banana.BananaUtils;
import io.leego.banana.Font;
import org.springframework.web.bind.annotation.*;

import java.util.List;

@RestController
@RequestMapping("/api")
public class PageController {

    @GetMapping("/fonts")
    public String getFonts() {
        List<String> options = Font.values().stream().map(Font::getName).toList();
        StringBuilder optionList = new StringBuilder();
        options.forEach(
                option -> {
                    String optionString = "<option value=\"" + option + "\">" + option + "</option>";
                    optionList.append(optionString);
                }
        );
        return optionList.toString();
    }

    @PostMapping("/ascii-art")
    public String asciiArt(@RequestParam("input-text") String inputText,
                           @RequestParam("font-select") String font) {
        return "<pre id=\"ascii-art\">" + BananaUtils.bananaify(inputText, Font.get(font)) + "</pre>";
    }

}
Certainly! Let’s break down the functionality of both APIs defined in the provided Java code:
/api/fonts : This API is called to provide a list of font options that can be used in the ASCII art generator. It retrieves a list of font names from the Font enum, which is part of the Banana library. Using Java Stream API, it maps each font name to an HTML
<option>element and appends them to a StringBuilder. The method returns the concatenation of these<option>elements as a single HTML string./api/ascii-art : This API takes user input text and the selected font as parameters and generates ASCII art accordingly. It uses the BanaUtils.bananaify method is then used to generate ASCII art based on the input text and selected font. The generated ASCII art is wrapped in a
<pre>HTML tag.
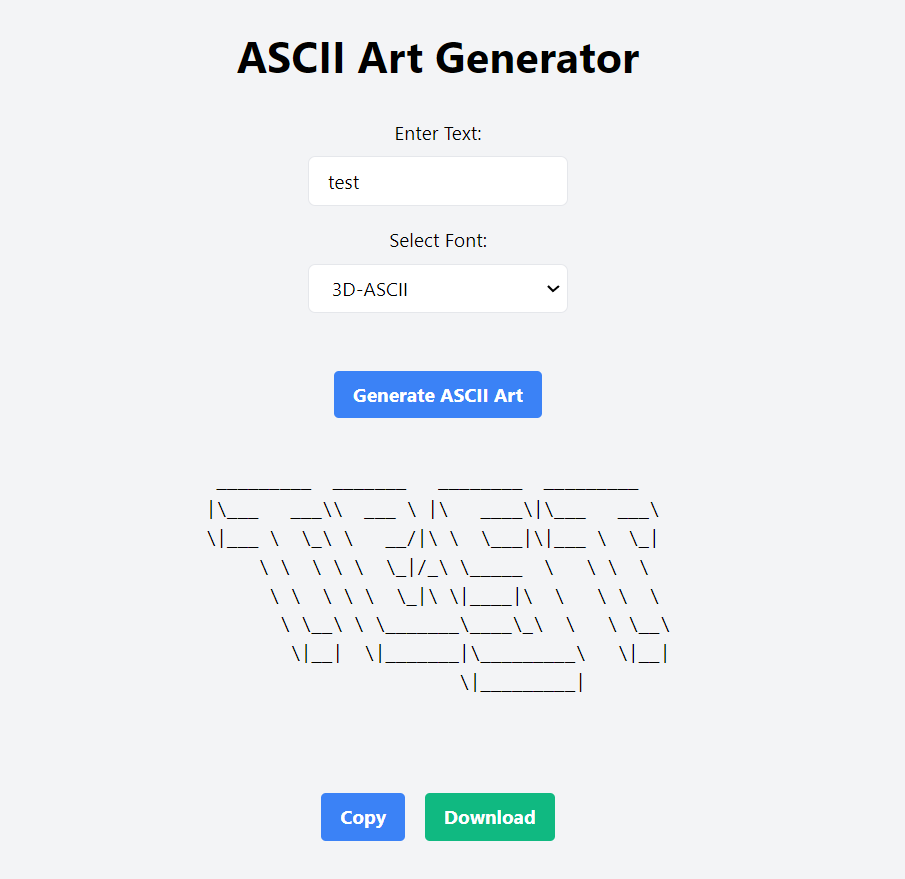
Now that we have the code let's run the application. Once the application is started you can go to http://localhost:8080/ and try out the application.
You can check the full source code of the application here 👇 GitHub - MaheshBabu11/ascii-art-generator: This is an ascii art generator from text using htmx and…
Also, It’s deployed on render if you want to try it out https://ascii-art-generator.maheshbabu11.dev/
In this article, we’ve built an ASCII art generator using HTMX and Spring Boot. HTMX makes our web pages more interactive, and Spring Boot provides a robust backend. With these, we’ve created a tool where users can input text, choose fonts, and instantly generate ASCII art. This project showcases the simplicity and power of combining HTMX and Spring Boot for dynamic and engaging web applications.
Happy Coding 😊!!! Leave a 👏 if you enjoyed reading it.