- Published on, Time to read
- 🕒 6 min read
Free Hosting Bliss - Deploying Your Spring Boot App on Render
- Authors

- Name
- Mahesh Babu
Free Hosting Bliss: Deploying Your Spring Boot App on Render
In the vast cosmos of cloud deployment, the quest for an affordable and user-friendly solution often feels like an endless odyssey. But fear not, fellow developers, for we’ve discovered a hidden gem in the nebula of hosting platforms — Render.com. In this article, we’re about to embark on an exhilarating journey, guiding you through the enchanting process of deploying your Spring Boot applications for free on Render.com. Get ready to witness the magic unfold as we prove that hosting can be seamless and budget-friendly.
Let’s start by creating an account on Render. Render offers a versatile range of service types to accommodate various application needs. The five primary service types include:
Web Service: Ideal for dynamic web apps with a public onrender.com subdomain, capable of receiving HTTP traffic. Suitable for public web applications built with frameworks like Express, Django, Rails, etc.
Static Site: Tailored for apps consisting solely of statically served assets (HTML, CSS, JS). Static sites, with a public onrender.com subdomain, leverage a global CDN. Suitable for frameworks like Create React App, Vue.js, and Gatsby.
Private Service: Designed for dynamic web apps without a public URL. While not externally accessible, private services provide an internal hostname for receiving traffic from other Render services over a shared private network. Ideal for deploying tools like Elasticsearch and ClickHouse.
Background Worker: Suited for internal apps that run continuously, processing jobs often added to a Redis-backed queue. Background workers do not expose a URL but can send outbound requests to other service types. Compatible with frameworks like Sidekiq and Celery.
Cron Job: Tailored for internal apps that run and then exit on a defined schedule. Cron jobs do not have a URL but can send outbound requests to other service types. Suitable for executing scheduled tasks, such as running a bash command or script.
In addition to these service types, Render provides fully managed data stores:
PostgreSQL: A robust, open-source relational database supporting features like read replicas, point-in-time recovery, and high availability. Render offers free instances with a 90-day expiration.
Redis: An in-memory key-value store ideal for use as a job queue or distributed cache. Render provides free instances, and all paid instances regularly write to disk for data persistence across restarts.
Since there is no direct way to deploy the spring boot app to Render we will be using a docker image for deployment. For this use case, we will be using the ASCII Art Generator that we have created here 👇 Bridging the Gap: Full Stack Development with HTMX and Spring Boot Showcase
Step 1: Building the application
To build the application above run the following command in the terminal. The command./mvnw clean package utilizes Maven to clean the project by removing previous build artifacts and subsequently packages the Java project, compiling the source code and creating a distributable package, often in the form of a JAR file.
./mvnw clean package
On a successful build, you will get a log like below and under the target directory, you can see the jar file for the application.

Step 2: Add the Dockerfile
    FROM eclipse-temurin:17-jdk-alpine
    VOLUME /tmp
    COPY target/ascii-art-generator-0.0.1-SNAPSHOT.jar ascii-art-generator.jar
    ENTRYPOINT ["java","-jar","/ascii-art-generator.jar"]
This Dockerfile is designed to package the ASCII art generator into a Docker container. It utilizes the Eclipse Temurin (AdoptOpenJDK) Alpine base image with Java 17, offering a lightweight and efficient container environment. The JAR file of the application located at _target/ascii-art-generator-0.0.1-SNAPSHOT.jar _, is copied into the root directory of the container and renamed as ascii-art-generator.jar. Finally, the default entry point is set to execute the Java application using the specified JAR file, ensuring the seamless deployment and execution of the ASCII art generator within the Dockerized environment. This Dockerfile streamlines the packaging process, making the deployment of the Java application consistent and reproducible across various environments.
Step 3: Build the Docker Image
Once the Dockerfile has been added to the root directory, you can run the command below to generate the Docker image. Make sure that you have docker installed on your system. If not you can follow the doc here
This generated docker image will then be stored in your local system.
docker build -t ascii-art-generator .
Step 4: Logging into Dockerhub
To push the Docker image to Dockerhub, you need to log in using the following command:
docker login
Make sure to provide appropriate credentials when prompted.
Step 5: Tagging the Docker Image
Now, tag the image with the following command:
docker tag ascii-art-generator maheshbabu1/ascii-art-generator:latest
This will create a new repository maheshbabu1/ascii-art-generator and will push the image ascii-art-generator when executing the next step.
Step 6: Pushing the Docker Image to Dockerhub
Now it’s time to push the tagged Docker image to Dockerhub using the command:
docker push ascii-art-generator
The image will be successfully pushed to your Dockerhub repository.
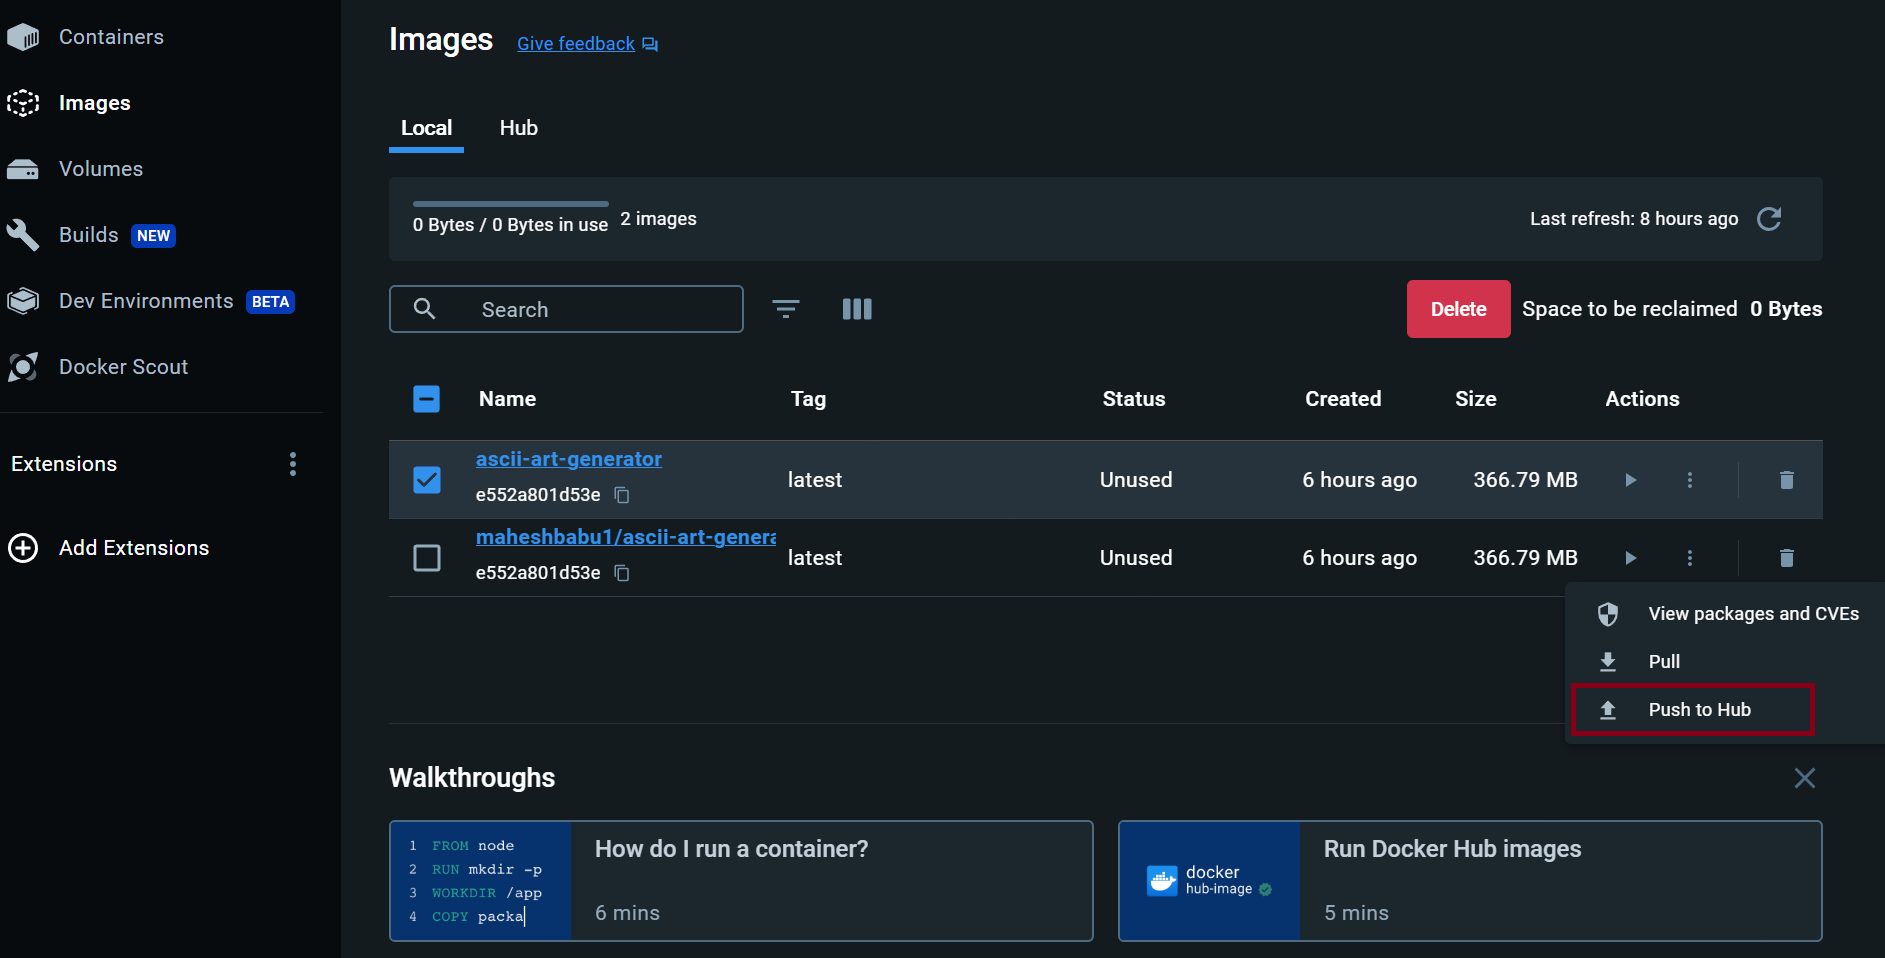
Alternatively, if you have Docker Desktop installed you can directly deploy the image to the Docker hub from here

Step 7: Deploying the application on Render
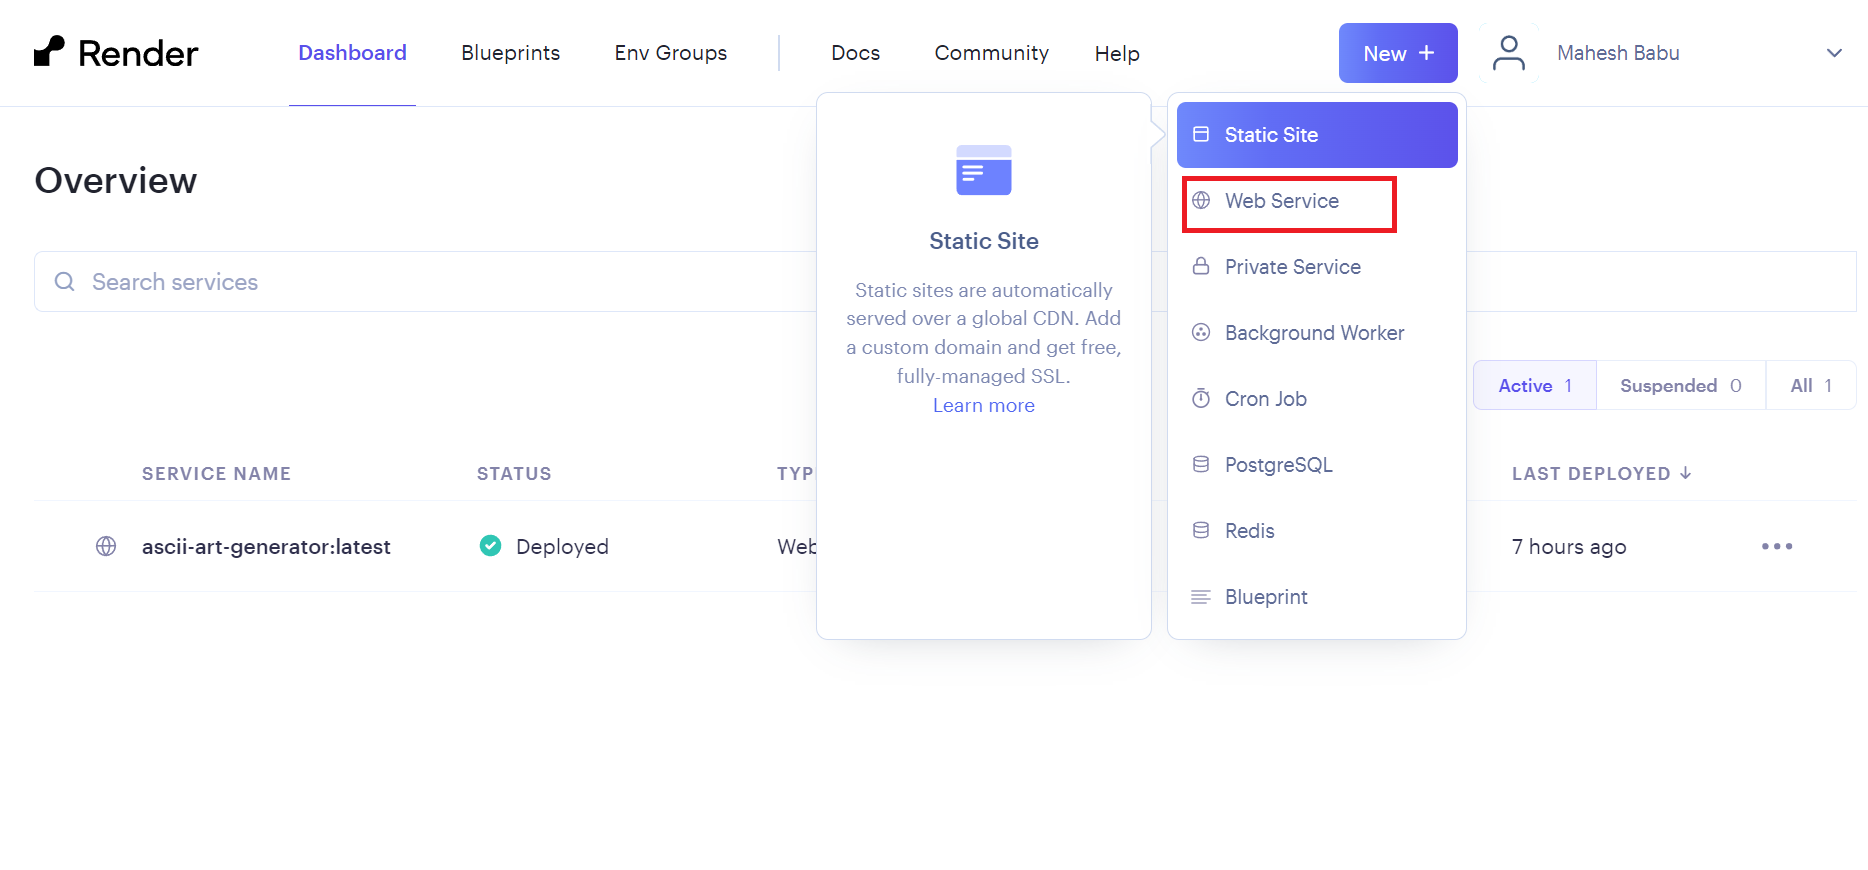
- Log on to render.com, you will land on the dashboard page which will look something like the below, Click on New and select the Web Service option.

- Select Deploy an existing image from a registry and click Next.

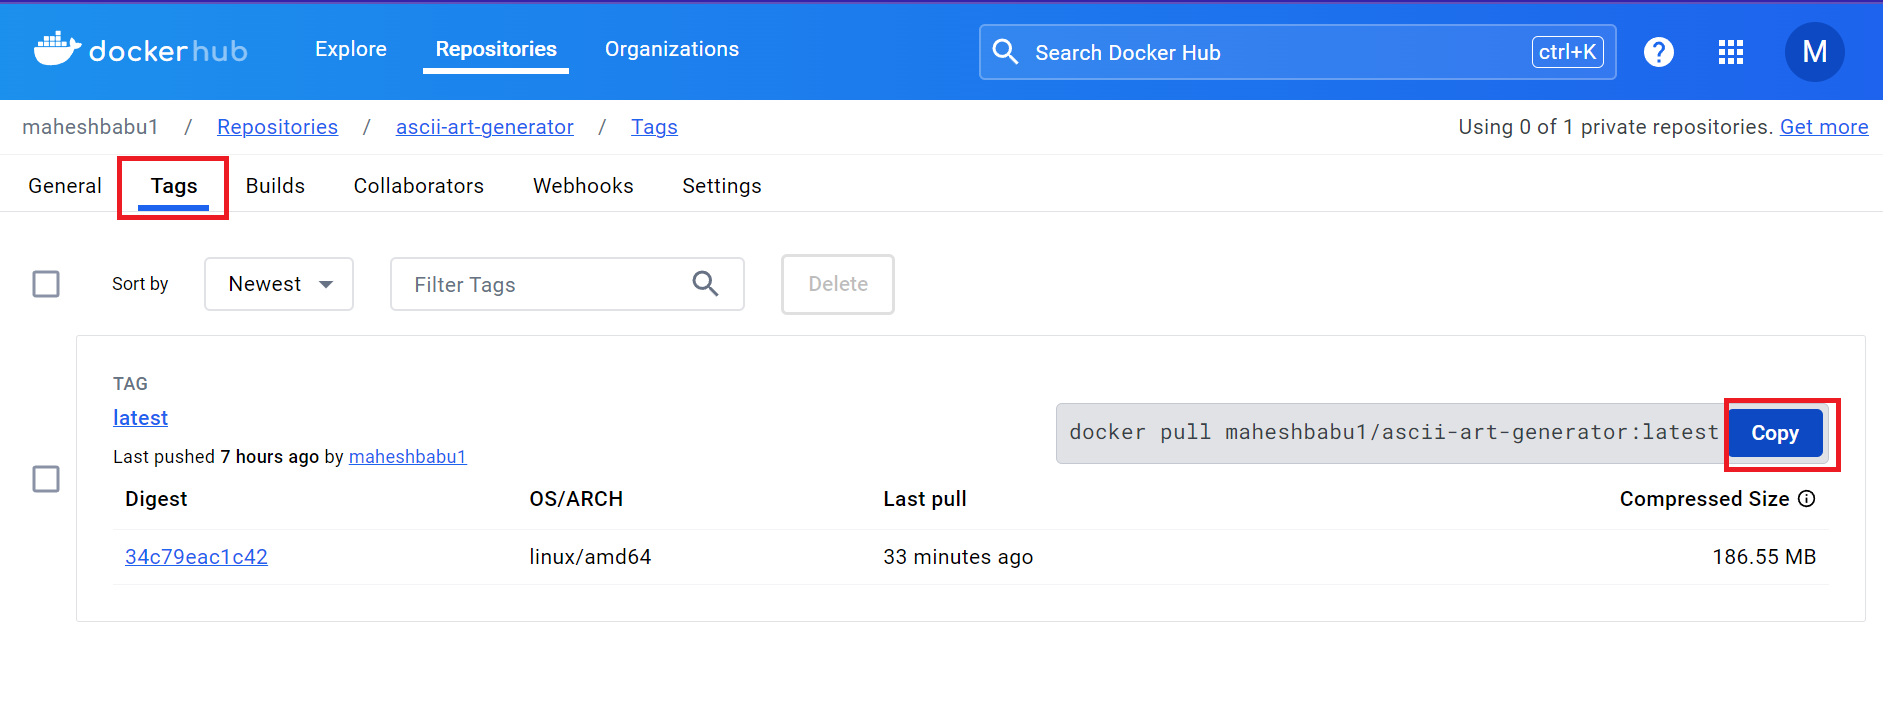
- Now you can head over to DockerHub and copy the pull command from the tags tab for the image you want to deploy.

- With that let's head over back to render and paste it in the next step and click Next.

Now you can give a name to your Web Service, select a region and instance type( Select the free one) and click on Create Web Service. Your Spring Boot application is now successfully deployed on render.com

Note that the free instance will spin down in case of Inactivity for some time. It can take up to 50 seconds for it to spin up again causing performance delays.
In conclusion, this article guided us through the construction of a Spring Boot application and the subsequent creation of a Docker image. Additionally, we delved into the deployment process on render.com, granting global accessibility to our application. The advent of Docker containers and platforms like render.com has transformed the deployment and operation of applications, offering unparalleled flexibility, scalability, and simplified management.
Happy Coding 😊!!! Leave a 👏 if you enjoyed reading it.
