
- Published on, Time to read
- 🕒 10 min read
Why I Ditched Google Photos and Set Up Immich on Windows
- Authors

- Name
- Mahesh Babu
Why I Ditched Google Photos and Set Up Immich on Windows

For years, Google Photos was my go-to place for storing every snapshot of my life. It had everything — automatic backups, smart search, face grouping, and seamless access across devices. But as convenient as it was, there was always this quiet trade-off lingering in the background: my data was no longer mine.
At first, I ignored it. After all, it was free, fast, and reliable. But over time, a few things started to pile up:
- The free unlimited storage went away.
- More and more features got paywalled behind Google One.
- I started seeing ads eerily aligned with the photos I’d taken.
- And most importantly, I realized I was giving up control over some of my most personal digital memories.
That’s when I began exploring self-hosted solutions — something that would give me the power to own my data, keep it private, and still offer a modern user experience. I came across options like Nextcloud Photos and PhotoPrism, but they either felt too clunky or required more setup than I was ready for. Then I found Immich, and it instantly clicked. It looked and felt like Google Photos but was open-source, fast, and made for self-hosters. What really surprised me, though, was how easy it was to get started — even on Windows. I didn’t need to dual-boot Linux or spin up a cloud VM. With just Docker Desktop, a few terminal commands, and a bit of curiosity, I had Immich up and running on my local machine in no time.
Why Immich?
After I decided to stop using Google Photos, I started looking for a good self-hosted substitute. My list of non-negotiables was as follows:
- Automatic mobile uploads had to be supported.
- It required a simple, user-friendly mobile and online interface.
- It ought to have functions like searchability, map-based photo viewing, and face recognition.
- Above all, it needed to be simple to deploy and open-source.
I experimented with a couple systems, such as Nextcloud Photos and PhotoPrism, but I kept running into issues. Performance was slow, the features didn’t feel very polished, or the user interface was out of date. That’s when I discovered Immich, and it changed everything.
Immich achieved the ideal harmony between strength and simplicity. It provides:
📲 Automated mobile backups using its iOS and Android applications
🧠 Machine learning-powered object detection and face recognition
🗺️ A map showing the locations of the images captured using EXIF data
🕵️♂️ Duplicate detection to maintain the cleanliness of your library
🧩 A vibrant, dynamic open-source community
🐳 Even on Windows, deployment is made simple with a Dockerized configuration.
The interface felt fast and modern, the setup was surprisingly smooth, and it actually made managing my photos feel fun again. It wasn’t just a replacement for Google Photos — it was a serious upgrade in terms of ownership, privacy, and freedom. In this post, I’ll walk you through exactly how I set it all up — step by step — so you can ditch the cloud and take back control of your photo library, too. If you want to demo it before installing you can try it here.
🧰 Step 1: Install Docker Desktop
- Head over to the official Docker Desktop download page
- Download the Windows version and run the installer
- During installation, make sure the option “Install required components for WSL 2” is selected
- Once installed, restart your system (recommended)
🐧 If you don’t have WSL2 installed yet, Docker will prompt you to install it. You can also follow Microsoft’s guide here.
⚙️ Step 2: Verify Docker is Running
Once your system restarts:
- Launch Docker Desktop
- Wait for it to say “Docker is running” in the system tray
- Open a new terminal (Command Prompt, PowerShell, or Windows Terminal) and run:
docker --version
You should see something like:
Docker version 24.x.x, build abcdef123
At this point, Docker is ready to go — and you’re all set to install Immich.
🚀Step 3: Installing Immich with Docker Compose
Now that Docker Desktop is up and running on your Windows machine, let’s get Immich installed using the official and recommended method — Docker Compose.
Immich makes this super straightforward by providing pre-configured files you can download and customize.
🗂️ Step 3.1: Prepare Your Workspace
First, open a power shell and create a directory to hold all the Immich configuration and data files:
mkdir ./immich-app
cd ./immich-app
Now download the official docker-compose.yml and .env files directly from Immich's latest release:
wget -O docker-compose.yml https://github.com/immich-app/immich/releases/latest/download/docker-compose.yml
wget -O .env https://github.com/immich-app/immich/releases/latest/download/example.env
💡 If you’re on Windows and don’t have wget, you can simply open those URLs in your browser, download the files, and move them into the immich-app directory manually. Make sure to rename example.env to .env.
#
# WARNING: To install Immich, follow our guide: https://immich.app/docs/install/docker-compose
#
# Make sure to use the docker-compose.yml of the current release:
#
# https://github.com/immich-app/immich/releases/latest/download/docker-compose.yml
#
# The compose file on main may not be compatible with the latest release.

name: immich

services:
  immich-server:
    container_name: immich_server
    image: ghcr.io/immich-app/immich-server:${IMMICH_VERSION:-release}
    # extends:
    #   file: hwaccel.transcoding.yml
    #   service: cpu # set to one of [nvenc, quicksync, rkmpp, vaapi, vaapi-wsl] for accelerated transcoding
    volumes:
      # Do not edit the next line. If you want to change the media storage location on your system, edit the value of UPLOAD_LOCATION in the .env file
      - ${UPLOAD_LOCATION}:/usr/src/app/upload
      - /etc/localtime:/etc/localtime:ro
    env_file:
      - .env
    ports:
      - '2283:2283'
    depends_on:
      - redis
      - database
    restart: always
    healthcheck:
      disable: false

  immich-machine-learning:
    container_name: immich_machine_learning
    # For hardware acceleration, add one of -[armnn, cuda, rocm, openvino, rknn] to the image tag.
    # Example tag: ${IMMICH_VERSION:-release}-cuda
    image: ghcr.io/immich-app/immich-machine-learning:${IMMICH_VERSION:-release}
    # extends: # uncomment this section for hardware acceleration - see https://immich.app/docs/features/ml-hardware-acceleration
    #   file: hwaccel.ml.yml
    #   service: cpu # set to one of [armnn, cuda, rocm, openvino, openvino-wsl, rknn] for accelerated inference - use the `-wsl` version for WSL2 where applicable
    volumes:
      - model-cache:/cache
    env_file:
      - .env
    restart: always
    healthcheck:
      disable: false

  redis:
    container_name: immich_redis
    image: docker.io/redis:6.2-alpine@sha256:148bb5411c184abd288d9aaed139c98123eeb8824c5d3fce03cf721db58066d8
    healthcheck:
      test: redis-cli ping || exit 1
    restart: always

  database:
    container_name: immich_postgres
    image: docker.io/tensorchord/pgvecto-rs:pg14-v0.2.0@sha256:739cdd626151ff1f796dc95a6591b55a714f341c737e27f045019ceabf8e8c52
    environment:
      POSTGRES_PASSWORD: ${DB_PASSWORD}
      POSTGRES_USER: ${DB_USERNAME}
      POSTGRES_DB: ${DB_DATABASE_NAME}
      POSTGRES_INITDB_ARGS: '--data-checksums'
    volumes:
      # Do not edit the next line. If you want to change the database storage location on your system, edit the value of DB_DATA_LOCATION in the .env file
      - ${DB_DATA_LOCATION}:/var/lib/postgresql/data
    healthcheck:
      test: >-
        pg_isready --dbname="$${POSTGRES_DB}" --username="$${POSTGRES_USER}" || exit 1; Chksum="$$(psql --dbname="$${POSTGRES_DB}" --username="$${POSTGRES_USER}" --tuples-only --no-align --command='SELECT COALESCE(SUM(checksum_failures), 0) FROM pg_stat_database')"; echo "checksum failure count is $$Chksum"; [ "$$Chksum" = '0' ] || exit 1
      interval: 5m
      start_interval: 30s
      start_period: 5m
    command: >-
      postgres -c shared_preload_libraries=vectors.so -c 'search_path="$$user", public, vectors' -c logging_collector=on -c max_wal_size=2GB -c shared_buffers=512MB -c wal_compression=on
    restart: always

volumes:
  model-cache:
This is the default configuration file for the Immich application. The configuration defines four primary services: immich-server, immich-machine-learning, redis, and database, each with specific settings and dependencies.
The immich-server service runs the core Immich server which listens on port 2283. The immich-machine-learning service handles machine learning tasks, such as image classification or tagging. The redis service is configured for caching. The database service uses a specialized PostgreSQL image with vector support for machine learning tasks.
Optional Features
Hardware Transcoding and Hardware-Accelerated Machine Learning You can set them up by following the links above depending upon your hardware configuration.
⚙️ Step 3.2: Configure the Environment
Now open the .env file in your favorite text editor (like Notepad++ or VS Code) and update the values to fit your setup. Here's what matters most:
UPLOAD_LOCATION=./library         # Where your uploaded media will be stored
DB_DATA_LOCATION=./postgres       # Where your database files will live
DB_PASSWORD=yoursecurepassword    # Change this to something unique (only A-Z, a-z, 0-9)
# TZ=Etc/UTC                      # Uncomment and set your timezone if needed
📁 Make sure the folders for UPLOAD_LOCATION and DB_DATA_LOCATION either exist or will be created by Docker in this directory.
▶️ Step 3.3: Launch Immich
With everything configured, fire up Immich using:
docker compose up -d
Docker will pull all necessary images, set up containers, and start the Immich service in the background.
To check if everything is running, you can use:
docker compose ps
If all containers show up as “Up,” you’re good to go. 
Once the application is up and running you need to register an admin user. The first user to register will be the admin user. The admin user will be able to add other users to the application. To register for the admin user, access the web application at http://<machine-ip-address>:2283 and click on the Getting Started button.
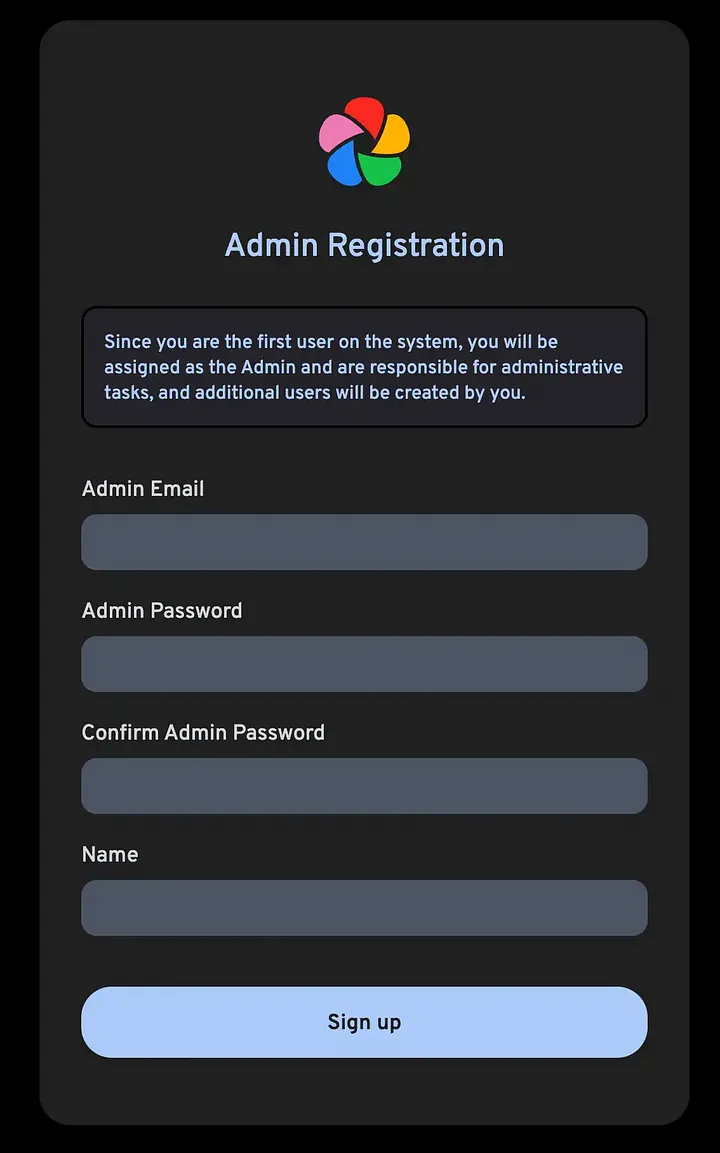
Once the admin user is created you can create other users and change other settings as mentioned in the official post installation doc.
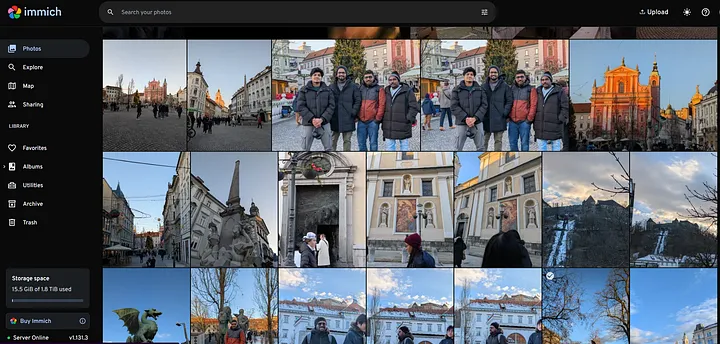
Now you can start uploading photos and your immich web app will look something like this:
One of my top priorities was having a reliable mobile app to back up photos automatically. Thankfully, Immich delivers on that front with well-maintained apps available on multiple platforms:
- 📱 Google Play Store
- 🍎 Apple App Store
- 🐧 F-Droid
- 💾 GitHub Releases (APK)
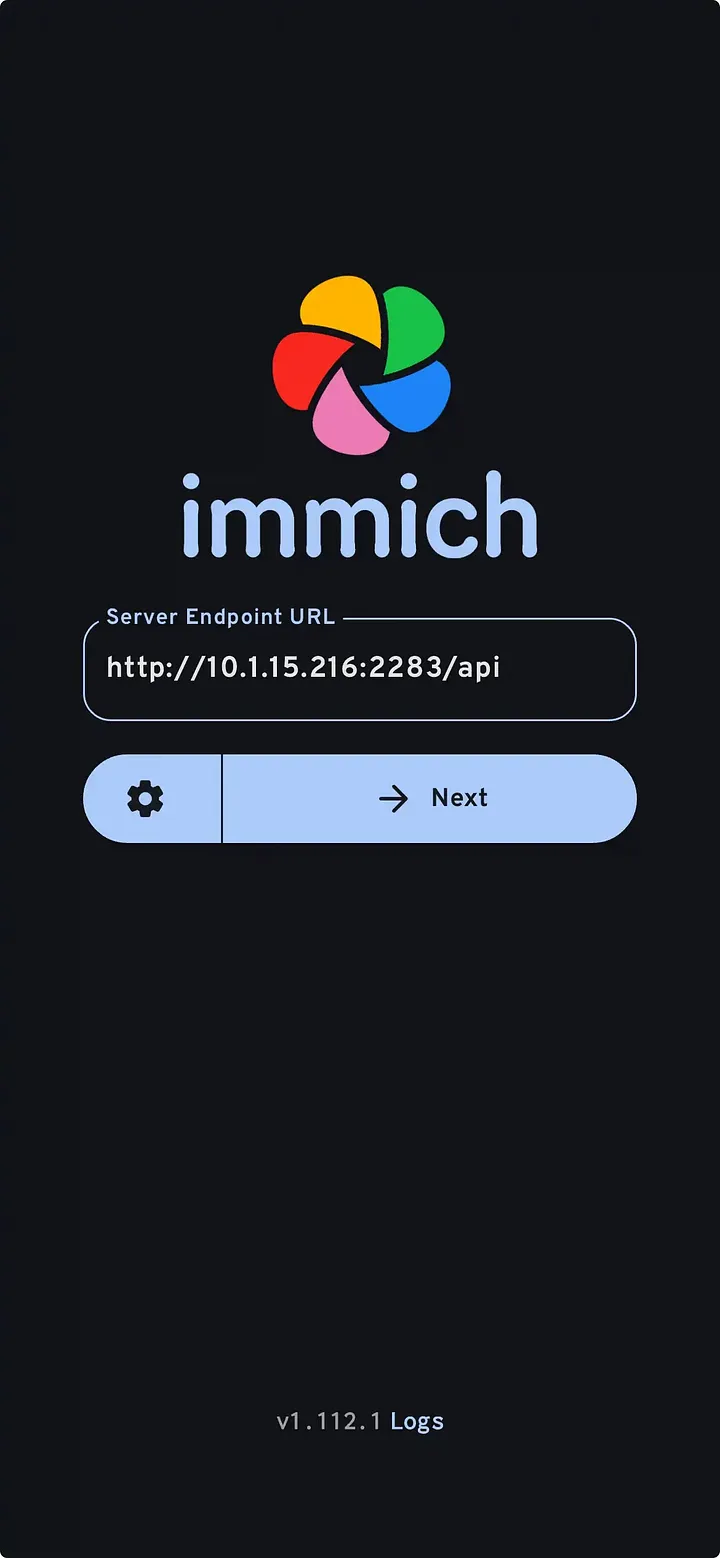
After installing the app on your device, you’ll need to point it to your Immich server. Simply enter the server endpoint URL in the format:
http://<your-machine-ip>:2283
📍 Make sure your phone is on the same network as your Immich server the first time you connect.
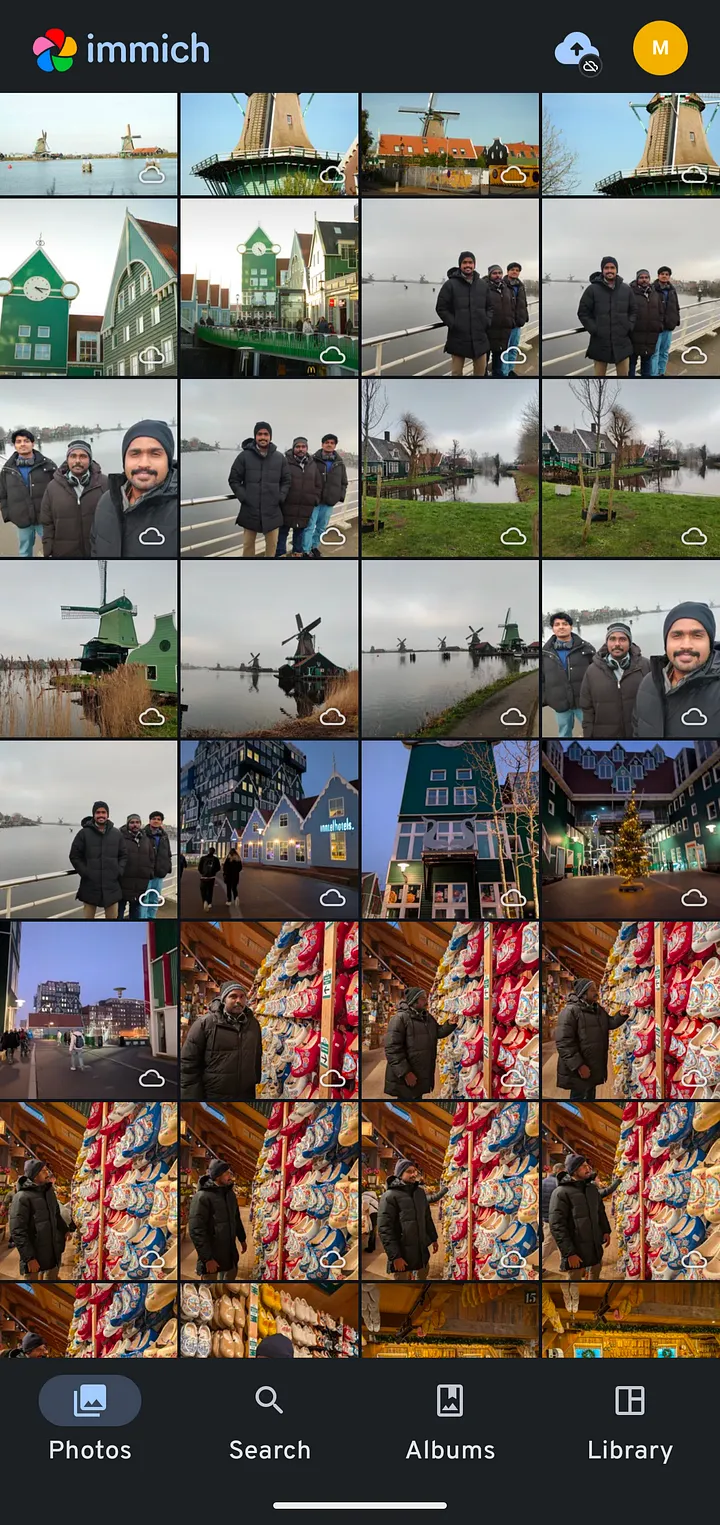
You’re now all set to enjoy Immich on your mobile — and this is where things get really fun. The app makes photo and video backups effortless. Just snap a picture, and it’s automatically uploaded to your server — no need to think about it. It’s fast, reliable, and gives you full control over your memories.
🎉 Wrapping Up
Setting up Immich on Windows using Docker Desktop turned out to be far smoother than I expected — and incredibly rewarding. Not only do I now have full control over my photo library, but I also get to enjoy powerful features like mobile backups, face recognition, and hardware-accelerated performance — all without giving up privacy or relying on a third-party cloud.
If you’re someone who’s been looking to break free from big tech photo storage, Immich is an excellent step forward — especially with its active community and steady updates. And the best part? You don’t need a fancy Linux server or a rack of hardware to get started. Just a Windows machine, Docker, and a bit of curiosity.
Give it a shot — your future self (and your photo collection) will thank you.
Immich is a passionate, community-driven open-source project actively developed and maintained on GitHub. What makes it truly special is not just the features — but the amazing team behind it, who are constantly improving the platform and listening to user feedback.
If you’ve found value in Immich and want to support its continued growth, there are a couple of great ways to give back:
- 🎽 Grab some merch — Not only do you get something cool to wear, but every purchase helps fund the project.
- 🧾 Purchase a license — Immich offers optional licensing as a way to show support, especially if you’re using it in a business or professional environment.
Supporting open source ensures projects like this can keep evolving, stay free for the community, and continue challenging the big players — all while respecting your privacy.
Show some love if you can. The team truly deserves it. ❤️
Leave a 👏 if you enjoyed reading it.